

Date last modified: Mon Feb 26 2024 1:53 PM
About 
TimeDicer is a free file backup and recovery solution (using rdiff-backup) for Windows (Windows 11, Windows 10, Windows 8, Windows 7, Windows Vista, Windows 2008 R2, Windows 2008, Windows 2003 - for 32-bit x86 and 64-bit x64). It allows you to backup and then later recover your files to/from a separate machine, with options for encryption (unsupported) and offsite mirroring. Even if you have subsequently altered or deleted files, and backed up your erroneous changes with TimeDicer, you can still recover versions that you previously backed up.
Under development since 2008 and with latest version dated 26 Mar 2024, TimeDicer backs up files to your own TimeDicer Server (which can be real or virtual), and is normally run as an automated daily routine for one or more computers located on the same local network (though it can be used in other configurations). TimeDicer is not in itself a system recovery tool, but if your system has been lost - and you have previously been using TimeDicer to backup your data - it will enable you to recover your data into a repaired or new system. It also works easily for recovering earlier versions of individual files.
TimeDicer carries out a push backup - that is, the backup is started by the source machine (the client) and data is pushed to the destination (the server). TimeDicer allows you to revert to different 'timeslices'. You could say it was dicing (that is, chopping or slicing) time - hence the name.
Not only does it give a backup which is a snapshot of files as they were at one time, but also earlier versions of these files, and files that were long ago deleted from your operating computer; so it adds the 4th dimension (time) to a backup archive, and does so elegantly, optimising both transfer (for speed) and storage (for space).
TimeDicer consists of:
- TimeDicer Client: a Windows command script (batch file) which can be run as a regular (daily) Scheduled Task to backup data from one or many Windows computers to the primary backup server. It allows backup of locked files. The latest version of TimeDicer Client is 8.14 (dated 26 Mar 2024), available here (changelog here). TimeDicer Client can backup to any Linux machine which has rdiff-backup, but for best integration it is recommended to use a dedicated TimeDicer Server. Instructions for installing and configuring TimeDicer Client are found below.
- TimeDicer Server: based on Ubuntu Server OS, for onsite backup - simple setup instructions below. It can be a virtual machine.
- TimeDicer Mirror Server: an optional machine like the TimeDicer Server, but offering secondary (e.g. offsite) backup
Please note that TimeDicer was developed by one person for an SME where it remains (2024) in daily operation. It is a small project and not widely used, but we are delighted if you want to try it and will endeavour to support you by email without charge.
Feature List
- No cloud services - all data remains on your own machines under your ownership and control
- All backup actions use secure encryption for data transfer
- Uses Windows Volume Shadow Services (VSS) to backup from a snapshot, so no locked file issues
- Backups are stored on your own standalone TimeDicer Server - independent of your operational machine(s)
- Option (unsupported) for drive encryption (LUKS + dm-crypt) on TimeDicer Server so your backups cannot be read by a third party
- Easy to implement for multiple machines, each with independent secure repositories on your TimeDicer Server
- TimeDicer Client has no TSR - consumes system resources only when running
- TimeDicer Server uses LVM, hence easy to expand and easy to backup/mirror
- TimeDicer Server can be a virtual machine, minimizing power and hardware requirements...
- ... or it can run on some of your old dust-gathering hardware
- TimeDicer Mirror Server (mirrored from Primary) provides a robust offsite backup solution
- TimeDicer Server Pool - two (or more) mutually-mirrored TimeDicer Servers can be offsite backups for one another
- Data security compliance (e.g. to meet EU or UK GDPR) is a snap, risk of security breach is reduced as data is held on your own machine(s)
TimeDicer is based on and uses a number of open source and free projects and software, in particular rdiff-backup and Rdiffweb, thanks are given to all the brilliant people who made and make these possible. Please send any questions about TimeDicer to dominic@timedicer.co.uk.
Server Setup: Installation & Configuration
TimeDicer Client can backup to any suitably configured GNU/Linux-based machine (i.e. server) which has rdiff-backup installed - the server can be virtual or physical. However the supported configuration uses a single-purpose TimeDicer Server running Ubuntu Server 23.10.
It is recommended that you locate your Primary TimeDicer Server (which can be a virtual machine) on your local area network (LAN), not at an offsite or remote (internet) location. To backup to an offsite location you can later create a Mirror TimeDicer Server (see below).
Having a single-purpose TimeDicer Server, rather than using a machine which has other functions, is strongly recommended because it makes it easy to duplicate following the ‘recipe’ here. You can create a secondary ‘mirror’ server offsite, synchronize it daily with the primary server and then, if disaster strikes and the primary server is lost, you can recreate it using the instructions in this section and then mirror your data back to it from your secondary server.
Running this setup will take about 20 minutes. It is based on a machine with a single hard disk, and if required you can expand the system later onto additional disks. The instructions do not cover use of RAID; although this is compatible we consider it safer instead to mirror your TimeDicer Server regularly to a Mirror TimeDicer Server in a different location (see below).
This setup also works if creating your TimeDicer Server as a virtual machine e.g. using Virtual Box or Vmware: just make sure to select a 'bridged adapter' type for the virtual network settings so that your server has its own ip address.
- Create bootable media: Download the Ubuntu Server ISO from the official Ubuntu location - at the time of writing here. Make sure you have the correct version! Then:
- if installing from physical DVD, use your preferred DVD burning software to create the DVD;
- if installing from physical USB, create a bootable USB - at the time of writing instructions can be found here (or google 'create ubuntu live usb').
- Install Ubuntu Server: Boot your machine from the Ubuntu Server USB/ISO/DVD. For installation choose to install Ubuntu Server, and except as specified here follow the default settings (or yes where that is obviously the correct answer):
- For 'Choose type of install' 'Choose the base for installation' accept the default suggestion of 'Ubuntu Server';
- For 'Guided storage configuration' accept the default suggestion (i.e. use entire disk, set up as LVM group, you can choose to encrypt with LUKS but this is unsupported);
- 'Your name' - recommended to use TimeDicer
- 'Your servers name' - recommended to use timedicer1 for your primary server (use timedicer2 for a secondary or mirror server, or timedicer3-timedicer9 for other machines that will belong to the same TimeDicer Server Pool)
- 'Pick a username' - recommended to use timedicer, set your own password (and don't forget it!)
- There is no need to pick any extra packages to install (even OpenSSH), everything will be handled later by timedicer-server-setup (below)
- First Boot of TimeDicer Server: After the installation process has completed, reboot and log in to the machine with the username and password you created above. You can find the IP address of the machine by logging in at the local console and typing hostname -I, or by examining your local router's admin web page; once you have this then you can log in to the machine remotely from Windows with putty or from Linux with ssh. A big advantage of remote login is that you can copy and paste from here.
- Download and run timedicer-server-setup: Substituting your own email address for the one given in the last line below, and entering only the text after the first '$' or '#' sign on each line, do:
$ sudo -iYou may have to answer some questions about your timezone and about postfix (outgoing email) configuration:
# setup=timedicer-server-setup.sh
# wget -O /opt/$setup https://www.timedicer.co.uk/programs/$setup
# chmod 744 /opt/$setup
# /opt/$setup -f my@emailaddress.com- 'General type of mail configuration' - select Internet Site if you want to send emails direct from this machine (this is likely to be unreliable unless the wan-facing ip is static) or Satellite System if you need to send via another relaying smtp server using STARTTLS.
- 'System mail name' - this is the domain name part of the source email address for emails sent by your TimeDicer Server (e.g. mydomain.com in timedicer@mydomain.com) - use your real domain name or at least a name that appears to be a real domain name e.g. mytimedicer.org. This domain name does not have to be exclusive to this machine.
- 'SMTP relay host' - if you have selected Satellite System you need to provide the name of the relayhost through which this machine will relay its emails; you must include the port if it is not 25 (e.g. myrelayhost.tld:587).
- 'Username' and 'Password' - if you have selected Satellite System then a few seconds later you will be asked for the username and password for connection to the relayhost. This is tested using STARTTLS and you should see a confirmation that a successful connection was made. (Note: there is no option at the present time for setting up or testing relaying via SSL/TLS using port 465/SMTPS.)
- Check for email: the system should have sent you an email to report that it is up and running; if you don't receive this check the log with tail /var/log/mail.log.
- Test your webserver: you should be able to reach your new TimeDicer Server's web page from any other computer located on your lan, by using a browser and pointing it at the TimeDicer Server's ip address e.g. http://192.168.1.35.
- Secure your webserver: there is a second web interface at port 8080 e.g. http://192.168.1.35:8080 - used by Rdiffweb (see below). You should log in here as the administrator with username 'admin' and change the password from the default setting 'admin123'.
- Reboot: because of the large number of changes to the system, reboot now: reboot, and then log back in.
Making a Backup: Using Client
You create backups from your Windows machine(s) by running TimeDicer Client. The latest version is 8.14 (dated 26 Mar 2024), and it can be downloaded here (changelog here, man page here):
- Download timedicer.zip, extract the contents to a temporary location, then run install.bat with administrative privileges (e.g. right-click on install.bat and choose 'Run as Administrator'). If Windows blocks the file from running then select 'More Info' and 'Run anyway'. Enter the ip address of your TimeDicer Server when requested.
- Use Puttygen which is started by the install routine (or you can find in the TimeDicer folder) to generate a new public/private key pair. Under 'Parameters' you should have 'SSH-2 RSA' selected and 'Number of bits in a generated key' set to 2048. Click 'Generate' and move your mouse around a bit as advised. Save the private key as privatekey.ppk at %APPDATA%\TimeDicer (despite the warning message, don't set a 'Key passphrase').
- Install the public key into your TimeDicer Server by visiting its website (port 80 not 8080 i.e. not the Rdiffweb page that ends with ':8080'): to do this, select and copy all the text from Puttygen's 'Public key' box (beginning 'ssh-rsa') and paste it in to the webpage - and follow the instructions on the webpage. The webpage also requests a password, this is not required to make a backup but it will be needed later when you use Rdiffweb to recover files.
- Check and if necessary modify your configuration file %APPDATA%\TimeDicer\timedicer.txt, which has been created and is opened automatically by the install routine, as required. This could be as simple as these lines:
SET server=192.168.1.35This tells TimeDicer Client that the TimeDicer Server is at 192.168.1.35, to exclude files based on the names listed in exclude-filelist.txt, and to backup your userprofile (%USERPROFILE%, which contains your Desktop, Documents, Pictures, Music etc) to an archive on the Server called 'userprofile'.
SET excludelist=%APPDATA%\TimeDicer\exclude-filelist.txt
%USERPROFILE%,userprofile - Now is a good time to consider what you really want to backup! Your first backup might take a long time to complete and you want to avoid backing up unnecessary data. Have a look at the usage of your hard disk with a program like WinDirStat. TimeDicer Client should be configured according to the instructions that you can can see here. Set the line(s) in your TimeDicer configuration file, and in your excludelist file, accordingly.
- Run TimeDicer Client from your start menu or your Desktop by right-clicking on TimeDicer.cmd and choosing 'Run as Administrator'. If Windows blocks the file from running then select 'More Info' and 'Run anyway'.
- When it has completed, have a look at the log file (unless you specified something different, it is saved at %APPDATA%\TimeDicer\timedicer-log.html - you can open it from your browser e.g. File/Open), and also visit your TimeDicer Server's Rdiffweb webpage and login as user for this machine (see Recovering Files with TimeDicer); here you can see and recover backed up files from the server.
- If errors have occurred the log file will be automatically displayed and you can also take a look at the output in the TimeDicer command prompt window which will pause at the end of the run (only if there is an error - to prevent pausing use /x switch). If you can't solve the problem, send an an email.
- Once you are happy with your backup, add it to Task Scheduler to run (say) daily; use /x switch to prevent TimeDicer from pausing on error (log file will still be automatically displayed). Unless you have switched off VSS (see below), make sure to set it to 'Run with highest privileges'.
- Note that to run TimeDicer using Volume Shadow Services (which is the best and default behaviour) it will require administrative privileges. If these are not available to you, disable VSS by adding the command 'SET vss=n' to your configuration file, or using command line switch /i n.
- If at a later time you want to remove TimeDicer from your client machine, just delete the shortcut on the Desktop and the two folders %ProgramFiles(x86)%\TimeDicer (or %ProgramFiles%\TimeDicer), and %APPDATA%\TimeDicer.
You can also make compatible backups from machines running Linux to TimeDicer Server by running rdiff-backup, but this is unsupported. The same may be possible from machines running macOS or FreeBSD.
Recovering Files with
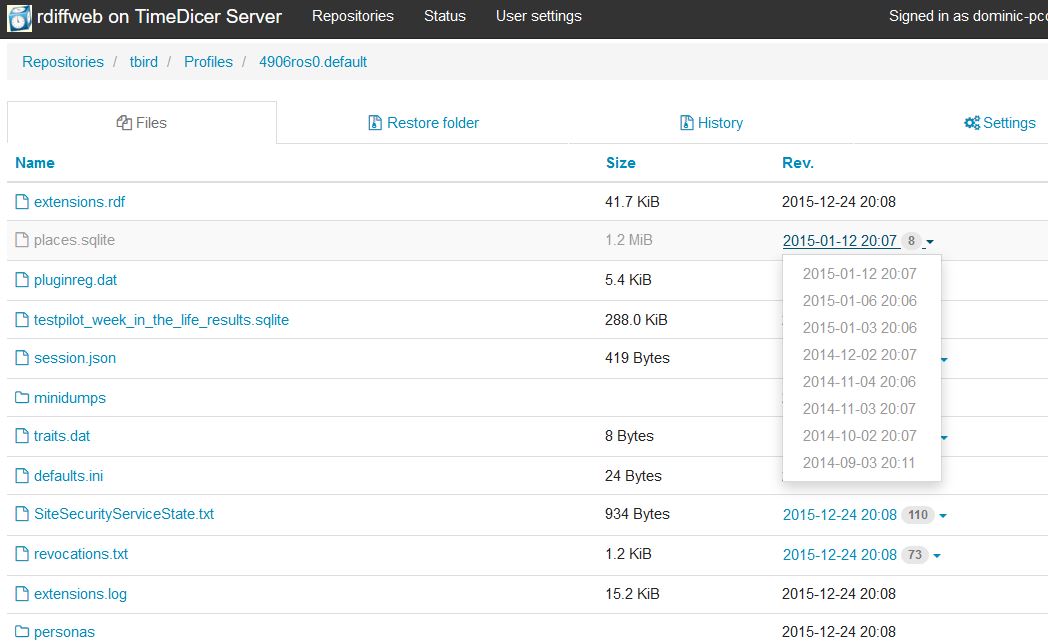
There are two ways to view or recover files, including earlier versions:
- Rdiffweb - for everyday purposes this is the recommended way to recover files because it works easily through a web interface. You login in to Rdiffweb at http://timedicer_server_ip:8080, supplying the username and the password that was set when this user was set up via your TimeDicer Server's web page. The first time that you login to Rdiffweb as this user, you may need to update the Backup Locations by clicking on 'Preferences', then on 'Find and Update Backup Locations', and then on 'Rdiffweb'.
- rdiff-backup command line (--restore option) - this is the more powerful but less user-friendly way to recover files. Study the rdiff-backup manual. The log file created by TimeDicer shows the command used for each backup session - this is a helpful starting point for constructing a restore command.
Updating Server
It’s a good idea to update TimeDicer Server regularly because new features might be added or bugs fixed. The easy way to do this is to rerun the setup script without any parameters:
Just press enter to skip all questions except the first and third:
- Download and extract key scripts from www.timedicer.co.uk - y
- Download and install latest updates for Ubuntu [version] - y
Mirror Server Setup
Having a second or mirror TimeDicer Server is optional but strongly recommended. Your Primary TimeDicer Server needs to be on your local LAN, so that your source machines can reach it easily, fast, and with a stable connection; but this means it probably has the same physical vulnerability as the source machines. Having a remote off-site mirror protects against a catastrophe (earthquake or whatever) that might affect both the source machines and your Primary TimeDicer Server. The mirror is essentially a copy of the Primary TimeDicer Server, updated regularly.
Why, you might wonder, does the Primary Timedicer Server have to be on the LAN? The overriding reason is that rdiff-backup, which is used by TimeDicer Client to communicate with the primary server, requires a stable network - if the connection breaks during a backup session, the data on the server can be damaged. Although rdiff-backup should correct this on the next run, repeated instability might result in irrecoverable damage to the backup archives. By contrast, rsync - used (by timedicer-mirror) to synchronize data between the Primary and Mirror TimeDicer Servers - copes well with the breaks in a session which can occur when sending data over the internet.
To create a mirror TimeDicer Server, you follow the same procedure as above, except you should call the machine 'timedicer2' instead of 'timedicer1'. It could be important in future that the name of this mirror server ends with a digit that is not '1' (see the section below about operating a TimeDicer Server Pool) and it is logical for your second server to use '2'.
The mirroring of the setup and data from your Primary TimeDicer Server is handled by the timedicer-mirror program (located in your Primary's /opt folder). Before running this for the first time, you need to add the public key of the root user of your primary machine to the list of authorised users on your mirror (secondary) machine. To do this, log in to your primary machine with putty, show the root public key sudo cat /root/.ssh/id_rsa.pub (this was created by the timedicer setup program), and use your mouse to select/highlight the full text of the key, which copies it to your clipboard. Now log in to your mirror machine with putty and do sudo nano /root/.ssh/authorized_keys; with nano open, just right-click in this window to paste the public key into here, then CTRL+x and answer 'y' to save the change.
The basic operation is to run, on your primary server, /opt/timedicer-mirror.sh to mirror its contents to the secondary machine. An additional feature is that if it is supplied with the mac address of the secondary server, the program can 'wake' it up and then put it to 'sleep' after completion (if your mirror server is behind a different router this this router may require port-forwarding configuration because it is unlikely to admit broadcast packets, please contact me if you have problems with this).
For the initial tests and the first full run of timedicer-mirror it's probably best to locate the secondary machine on the same local lan as the primary - it is easier for testing and much faster. First run it with options -ot, which tests all connections without transferring data, then try it with -f option which does everything except mirroring /home (and is still pretty fast), and when this is working fine, run with -ao which does a full backup and provides verbose live feedback - this might take a long time (many hours even).
With this first full backup complete, subsequent runs will be much quicker and so the secondary machine could now be placed at a remote location and the backup done over the internet. (It is quite secure because it uses ssh.) Typically it is run at night when plenty of bandwidth is available. Once it is running smoothly add it, without -ao options, to /etc/crontab to run each night.
The timedicer-mirror program mirrors directories /opt and /home from the primary to the mirror. It also copies Rdiffweb user details to the Rdiffweb database on the mirror, creates copies of /etc/crontab and /etc/rc.local and saves them in /opt with '.1' (or another digit depending on the primary machine's BaseID) appended to the names on both the primary and mirror machines, and creates users and groups on the mirror to match those on the primary, except for the root user (UID=0) and the primary user (UID=1000) which are not altered. Warning: because of the major changes which it makes to the destination machine, you should not run timedicer-mirror to a machine which has any other purpose than being a mirror for your primary or is part of your TimeDicer Server Pool (see below).
Important note: to ensure that your mirror server contains valid and recoverable data it is wise to complete an error-free run of (suitably-configured) timedicer-verify (see below) on the primary server before any run of timedicer-mirror - otherwise there is a risk that after data becomes damaged on your primary server you copy it over previously-good data on your mirror server.
Mutual Mirroring within a Server Pool
If you are responsible for more than one location and need offsite backups for both or all of them, you can use a TimeDicer Server Pool to provide mutual mirroring/backup of data. It works the same way as a Mirror Server but you must observe the following guidelines:
- Each TimeDicer Server in the pool must have a BaseID which is a number 1-9, and this must be unique within the pool. Normally this is determined by the digit at the end of the hostname (e.g. a machine named timedicer2 has BaseID 2), but this can be overridden by the file /opt/baseid which (if it exists) should contain a single digit. Failing either of these, the BaseID for a machine is 1. The BaseID for a machine can only be changed before you have created any local TimeDicer users (i.e. it can already be a Mirror Server but it cannot already be a Primary Server). [Local TimeDicer users will have uids and gids in the range BaseIDx1000+1 to BaseIDx1000+999.]
- Each TimeDicer user needs to have a username that is unique across the TimeDicer Server Pool. The script /opt/timedicer-rename-user.sh is available if you need to rename a user to avoid duplication of names between Servers; and you can set the username for the TimeDicer Client program with 'SET USER=' in its configuration file (see man page here). (Note: the primary user on each machine [uid 1000], which is normally used for logging into the command line interface and should not be used for running TimeDicer Client, does not need a name that is unique across the pool and indeed it is recommended that for this primary user you always use 'timedicer'.)
- Run timedicer-mirror from each machine in the pool to another. The process will ensure that data for TimeDicer users local to the source machine is updated on the destination, while data for TimeDicer users local to the destination machine, or for TimeDicer users local to other machines in the TimeDicer Server Pool, is preserved on the destination machine.
Managing And Adding Space On Server
There can be two types of space shortage. When you set up your TimeDicer Server, you probably didn't specify that all the space in the Volume Group (VG), i.e. drive partition, should be used by your 'root' or 'home' Logical Volume (LV), so it may have available space inside the VG that just needs to be added to the LV. In this case you just need to manage the space (1st para below) - but note that if you perform backups to a Secondary TimeDicer Server you should have at least 4 GiB spare inside the Primary Server's VG - i.e. unused by LV - for snapshots. Alternatively you may be running low on physical space in which case you will need to add some (2nd para below).
- Managing space on TimeDicer Server is easy! You will be emailed if space is running low on your 'root' or 'home' Logical Volume (LV) or you can check anytime as shown below. Login to the server with putty and:
- Refer to the email or do sudo /opt/lvm-usage.sh and look at the 'Free' space for your PV(s), to make sure you have sufficient physical storage space in the volume group. If you are short of physical space, add some as described below under 'Adding space to TimeDicer Server'.
- Refer again to the email to check the name of your logical volume (LV) e.g. /dev/timedicer/home.
- Here is a one-line example to use when you have at least 20 GiB showing as 'Free' in your PV and in your VG. This will extend a /dev/timedicer/home LV by 20 GiB and then resize the filesystem inside it to fill the new space. The LV name may be different in your case. (Note that making LVM volumes smaller is not so easy):
sudo lvextend -L+20G -r /dev/timedicer/home
- Adding space to TimeDicer Server is easy too! If you are running out of physical storage space:
- Add a physical hard disk to your system (or if you are using a VM you can add a new virtual disk).
- Login in to the server with putty. sudo pvs shows drive partition(s) (in 'PV' column) that is/are already part of your LVM system and the name of your volumegroup or VG (in 'VG' column). Now find the new disk by listing all your disks and partitions with sudo parted -l|grep Disk - check that neither the new disk nor its partitions (if any) have appeared in the pvs list. Let’s assume here that the new disk is /dev/sdb...
- Partition the new disk with sudo parted /dev/sdb. Create 1 (primary) partition for the whole disk and set flag for Linux LVM [8E], leaving it not bootable, and then write the changes - for instance:
mklabel gpt(Note: mkpart uses start of 0% so parted tries to align the partition)
mkpart primary ext2 1MiB -1s
set 1 lvm on
quit - Add the new drive partition (same name as the new disk, with a '1' at the end) to your existing VG with vgextend. Assuming your existing VG is 'timedicer', for example: sudo vgextend timedicer /dev/sdb1. If this generates an error message try sudo partprobe /dev/sdb, then repeat the vgextend command.
- The new drive is now part of your Volume Group (VG) as an additional Physical Volume (PV) (you can confirm this with sudo pvs). To use the extra space just follow the instructions above on 'Managing space on TimeDicer Server'
Security & Privacy
- In principle each user's backup on your TimeDicer Server cannot be accessed by other users, so that one person's backed-up documents cannot be read by another person (as configured by timedicer-server-setup). But:
- Rdiffweb provides a way round this if one user knows the Rdiffweb username and password of a different user.
- The administrator can gain such access using sudo, and it is also easy for her to log in as any of the restricted users (by adding her public key to their authorized_keys files).
- It should be possible (but untested, unsupported) to backup securely from the TimeDicer Server to an untrusted location by using encfs; at the cost of more than doubling the space consumed on the Primary TimeDicer Server you could copy the contents of /home to an encfs-protected mountpoint and then you could copy (using rsync) the underlying encrypted directory to the insecure destination. A slightly different approach though still using encfs can be seen here.
- TimeDicer Client communicates with TimeDicer Server using ssh with a private/public key pair and this is extremely secure, provided you keep the private key safe. Rdiffweb however does not use secure communication and so the possibility of man-in-the-middle interception while recovering data using the Rdiffweb interface cannot be excluded. You could remove this security risk by recovering data using the command line program rdiff-backup.exe.
- Neither TimeDicer Client nor TimeDicer Server 'phone home', so no information about your installation (not even that it exists) is passed back to me at TimeDicer or indeed to any outside party. (However logs may exist of any downloads that you make from the TimeDicer website, including any updates obtained using timedicer-server-setup.)
- If your security/encryption/privacy needs are greater you might consider the (unsupported) possibilities below:
- When installing the underlying Ubuntu OS for TimeDicer you can choose to use 'encrypted LVM' (i.e. LUKS & dm-crypt).
- (Less easily) you can use fscrypt or a filesystem that supports encryption natively such as Bcachefs or ZFS. Discussion of the relative merits of these approaches can be read here.
- For even higher security consider TPM-backed full disk encryption. This is the only approach with protection against an evil maid; but if your motherboard is damaged you may lose data irretrievably.
Additional Notes
- Verifying backups: The utility timedicer-verify is provided in the TimeDicer Server's /opt directory, see the help information here. You can also use timedicer-bloatwatch.sh in the same location - run with -h to see help.
- What username should I have? When you 'Add New TimeDicer User' from the TimeDicer Server's homepage, the Server creates a Linux user, and normally you should (as advised on the homepage) set the username to the Windows machine's own 'username'-'domain', which in Windows parlance is %USERNAME%-%USERDOMAIN%, in lower case and with any spaces stripped out; for instance jimjones-widgetoffice. You can download a little batch file from the homepage to give you this so you don't have to work it out. If you choose to set something different you should also set 'user' appropriately in the TimeDicer configuration file.
- Backing up from more than one local partition: TimeDicer Client takes a snapshot of only one local partition, usually C:. This means that if you specify a range of datasets covering more than one local partition (e.g. C: and E:), then only one of them will be backed up from a snapshot and the other(s) will be backed up directly from an active drive, with possible file-locking issues. If you need to backup from snapshots of more than one local drive, do separate runs of TimeDicer Client using /n to specify the different source and archive each time.
- Foreign Language Characters: If you are backing up files with unusual characters (letters) in the filenames, it is necessary that Windows fully supports these characters from the command line. If they can't be viewed correctly from the command line then they can't be backed up correctly by TimeDicer. The solution is to add the relevant language for 'non-Unicode programs' (e.g. Chinese) under the Administrative tab in Region and Language setting of Control Panel (look first in 'Clock, Language, and Region').
- Where are backups stored? Each 'archive' is stored in a physical directory called a 'repository' at /home/'username'-'domain' - in the example case above this would be /home/jimjones-widgetoffice. If you specify a 'basearchive' in your configuration file then this introduces an additional directory level (or levels) to the repository storage - for instance if basearchive is set to 'archives' then the archives will be found at /home/jimjones-widgetoffice/archives/. The repository holds a copy 'in the clear' of the most-recently backed-up source data, and in addition in each repository there is a sub-directory 'rdiff-backup-data' which holds, in complex and compressed form, all the data about previous versions of files, included deleted files and directories. But you should never normally need to look here and if you change anything in it you might break your archive.
- Permissions / ACLs: There are old and unconfirmed reports that rdiff-backup, the engine upon which TimeDicer is based, is unable successfully to backup, or at least to restore, Windows ACLs (Access Control Lists). You are therefore advised to use the option setting --no-acls (set automatically for new Timedicer installations). This means that advanced file permissions will not be recoverable from a backup. For most users this will not be a problem for data files.
- Restoring ACLs: After recovering data from TimeDicer Server to say %APPDATA% or Desktop on the client machine you find that the ACLs are screwed up; for instance it may not be possible to save files to the recovered location. You can restore the default inherited permissions for the recovered directory using icacls from a Windows administrator command prompt. For example, if you recovered to %APPDATA%\Thunderbird, this restores inherited permissions for all files and directories below %APPDATA%\Thunderbird:
icacls %APPDATA%\Thunderbird /reset /t /c /q
- Changing a username / Deleting a user: If you reconfigure a source machine (for instance, system upgrade) the %USERNAME%-%USERDOMAIN% may change. To continue using the same backup identity you could add a line beginning 'SET user=' to the configuration file, but as an alternative you can change the name on the TimeDicer Server using the timedicer-rename-user script thus: sudo /opt/timedicer-rename-user.sh oldusername newusernameIf you are using a TimeDicer Mirror Server you must run the same script there. This script can also be used with -x option to delete a user account (and all its archives).
- Bitlocker / EFS: Files on EFS encrypted file system (available in Professional versions of Windows) cannot be backed up using VSS. The workaround is to disable use of VSS by TimeDicer Client. The same is surely true (but untested) for files on drives using Microsoft's BitLocker.
Links
- rdiff-backup - the underlying backup technology used in TimeDicer
- Thalia Villa - elegant 3 bedroom villa in Coral Bay, Cyprus
- Villa Chez Max - luxurious 5 bedroom villa in the Peyia Hills, Cyprus
Donation
I have provided this software free gratis and for nothing. If you would like to thank me with a contribution, please let me know and I will send you a link. Thank you!
My Other Sites
- Finding a 4D Backup Solution
- Web Scraping How To - extracting data from web sites
My Programs
Here is a selection of some (other) programs I have written, most of which run under GNU/Linux from the command line (CLI), are freely available and can be obtained by clicking on the links. Dependencies are shown and while in most cases written and tested on an x86-based Linux server, they should run on a Raspberry Pi, and many can run under Windows using Windows Subsystem for Linux (WSL) or Cygwin. Email me if you have problems or questions, or if you think I could help with a programming requirement.
Backup Utilities
- rdiff-backup-regress - GNU/Linux script to regress an rdiff-backup archive. [ GNU/Linux: 2012-16 ]
Debian/Ubuntu kernel and LVM Utilities
- kernel-remove - GNU/Linux script to list the installed GNU/Linux kernels in a Debian-based distro (e.g. Ubuntu), and can be used to remove an unwanted kernel and related packages, updating grub appropriately. [ GNU/Linux-Debian/Ubuntu: 2010-22 ]
- lvm-usage - GNU/Linux script to show available disk space and how it is used; run as cron job to warn if usage is above a set percentage. Provides additional information if LVM is in use. [ GNU/Linux: 2012-23 ]
- lvm-delete-snapshot - GNU/Linux script to remove LVM snapshot that has been left over by another process. [ GNU/Linux: 2012-21 ]
- netnames - GNU/Linux script shows current name, biosdevname and 'predictable name' of network device - helps with network device name scheme migration. [ GNU/Linux-Debian/Ubuntu: 2020-20 ]
- lv-convert2cache - GNU/Linux script to convert an existing LV into a cache LV using a smaller faster device as a cache. [ GNU/Linux: 2022-23 ]
Miscellaneous Programs
- sleepwalker - Windows© program which can be run from a remote machine to 'wake up' a Windows© machine behind a router, wait for it to start and then initiate Remote Desktop session. [MS Windows©: 2008-22]
- numliststat - GNU/Linux program giving statistical value(s) for a piped-in list of numbers. [ GNU/Linux: 2022-22 ]
- relay-enforcer - GNU/Linux program enabling a postfix-based mail server relaying to Gmail to act on reports from Gmail about blocked emails. [ GNU/Linux: 2016-24 ]
- pdf-compress - GNU/Linux program to create smaller b/w pdf file from an original large pdf file, especially when original resulted from scanning. [ GNU/Linux: 2016-23 ]
- tiny-device-monitor - GNU/Linux program to test webpages (including password-protected) or machines to check they are live; use as a cron job for your own websites, for hardware presenting a webpage, or for any machines with a presence on your local LAN or on the internet. [ GNU/Linux: 2009-24 ]
- form-extractor - GNU/Linux program to extract form tags from a web page or downloaded file. [ GNU/Linux: 2012-20 ]
- mythic-dns-sync - GNU/Linux program to update DNS record at mythic-beasts.com to match local external ip. [ GNU/Linux: 2016-23 ]
- saynoto0870 - For UK, a GNU/Linux script which performs automated lookup of the www.saynoto0870.com database, finding cheap or free geographic number replacements for expensive non-geographic (087* or 084*) numbers. [ GNU/Linux: 2012-12 ]
- bind9-resolved-switch - GNU/Linux program for switching permanently between using bind9 or systemd-resolved as the system DNS resolver. [ GNU/Linux: 2016-22 ]
- unlock - GNU/Linux remote program for easy entering of decrypt passphrase on a remote machine which has root dm-crypt+LUKS. [ GNU/Linux: 2017-18 ]
- wifi-updown - GNU/Linux program to take down wifi interface if there is a working wired interface (or restore wifi if not). [ GNU/Linux: 2018-23 ]
- routefix - GNU/Linux program to restore a default ip traffic route if there is none such (e.g. after running wifi-updown). [ GNU/Linux: 2018-23 ]
- dutree - GNU/Linux program to show a tree-style list of files and directories at the specified location which are greater than the specified size (default 1GB). [ GNU/Linux: 2012-24 ]
- Accounts - Multi-business multi-currency accounting software, uses Access [MS Windows©: 1996-2024]
- Rents Program - Residential lettings/landlord front office program, with many special features for UK market [MS Windows©: 1991-2024]
This section is closed. If you have a question, please submit it by email, thank you.
\TimeDicer\ssed.exe was unexpected at this time
Replacing %runfom%\ssed.exe with !runfrom!\ssed.exe on line 102 seems to fix it?
I think there is a bug in the script. When I have no access to files, the web page shows a number of errors (files could not be read), but timedicer exits with message "TimeDicer completed without errors at $DATE $TIME". As the output of timedicer is parsed by my monitoring systems this is a really critical bug.
- would be nice to access a plain output log for parsing
- have the rdiff-backup error code to check if timedicer output is correct.
Thanks in advance,
Christoph
Thanks for all the hard work on this! I'm trying to set up the first server of what will be a 3 server pool. I have one problem and one question. The problem is that webrdiff appears to not be running as there is no page accessible at ipaddress:8080. The main page works fine. How do I check this out?
Question is how do I change postfix to email to a different port? I'm using Gmail and they require TLS. The setup never asked for anything but username, password and smtp server.
Thanks again,
Terry
on a fresh install of ubuntu server 16.04 and also on debian 8 i became this error:
root@timedicer1:/opt# hostname -I
192.168.0.20 2003:e8:83c4:5a00:a00:27ff:fec1:5f6a
root@timedicer1:/opt# wget -O timedicer-server-setup.sh
...
Verbindungsaufbau zu ww.timedicer.co.uk (ww.timedicer.co.uk)|62.31.71.15|:443... verbunden.
...
Länge: 23346 (23K) [text/x-sh]
In »»timedicer-server-setup.sh«« speichern.
timedicer-server-setup.sh 100%[==========================================================>] 22,80K --.-KB/s in 0,07s
2017-06-09 10:30:35 (329 KB/s) - »timedicer-server-setup.sh« gespeichert [23346/23346]
root@timedicer1:/opt# chmod 744 ./timedicer-server-setup.sh
root@timedicer1:/opt# ./timedicer-server-setup.sh -f mymailaddress
timedicer-server-setup.sh v7.0425 [25 Apr 2017] by Dominic (try -h for help)
=========================
Unable to find ip address from this machine, aborting...
root@timedicer1:/opt#
- what can I do to resolve this error?
Thanks
Frank
For the server, it would be quite possible to have a script that automagically deletes old backups but I prefer to control this manually. TimeDicer is efficient about storage: for source data that doesn't change, new backups use virtually no space.
The TimeDicer Server warns you by email if space is running low (default settings are a daily test <30% available).
The log file is kept on the client and it is unlikely to get large in absolute terms, just in terms of speed of loading in a browser. I have a script which renames log files when they get over 4MB size.
You could get quotas on the server by installing quota, maybe other ways too.
Roman
It does not automatically delete old backups - why would you want to, they don't usually take up much space! But you can do so manually by using rdiff-backup --remove-older-than from the command line.
One thing it doesn't do (at present) is to automatically clean up the client log file, which over time can become very large and thus very slow opening. The solution is to rename or delete it periodically.
this is really a very promising backup solution. Two questions: Can it delete old backups automatically? Does it correctly handle unfinished backups? Thanks Roman
hmm nope, on both systems it downloaded to the C:\Users\user\Downloads folder, then done extract to timedicer\ with WinRAR and ran it from there.
Full path: C:\Users\user\Downloads\timedicer
So far everything has worked besides that, its currently doing the first backup to the VM server!
Thanks for the great effort with TimeDicer!
I have been using rdiff-backup for a while now can't believe I hadn't come across TimeDicer earlier. Much more safer as I've had the network drop out while backing up a couple times.
Your instructions are perfect, I installed Ubuntu Server in Virtualbox and can access the webpage without a problem.
However installing the windows client, I run install.bat as administrator, it waits for any key to be pressed and as soon as I press something, it quits. I check the program files x86 and the %appdata% directories and nothing was installed. Tried on windows 2012 r2 x64 and win 7 x64.
I took at look at the install.bat in notepad and noticed at line 47, GOTO :EOF, I removed that line and it installs fine, asks for the ip and opens puttygen. Haven't actually tested further but I guess would work fine.
Thought I'd let you know so you can check it out better! I don't really understand the code all that well haha
I also tried updating rdiffweb to the latest dev version (it has pretty graphs and a way for people to add their own SSH keys inside rdiffweb itself). It seems to mostly work except the old rdiff-web-config script is broken so it can't create users.
I wrote a python script the new user cronjob can call to add rdiffweb users - I would be happy to email it to you if you want it.
One feature I'd love to see added though - syncing between two primary servers. It would be awesome to have two servers that can handle local backups at each location, and then sync to each other.
yes the admin username/password is mentioned above (but it is different from what used to be).
There is/may be a bug that when you add users through the TimeDicer webpage the matching rdiff login is not set up correctly and has to be done manually. I may need Patrik's help to solve this - the old rdiffweb script that used to do this no longer works I think.
On First start, you should access rdiffweb using default crendentials: * username : admin * password : admin123
I have to rebuild my timedicer-server after a hdd-crash.
I install on a Ubuntu 14.04 VM. After install I connot log in to rdiffweb 0.8.3 on ip:8080. All login's end with Warning: Invalid username or password.
I have used the sudo-user to install Timedicer-server, and attemp to do first login with this user. I canadd a backup-user on port 80, but this user can't either login to rdiffweb on port 8080.
TimeDicer failed with error 20 - error at second invocation of vshadow - try running with /d option
Using the /d option doesn't help.
The following error also appears:
Backing up f: (as W:) using TimeDicer v5.0910: TimeDicer.cmd /d.
Summary
VSHADOW.EXE 3.0 - Volume Shadow Copy sample client.
(Option: Generate SETVAR script 'C:\Users\omitted\AppData\Local\Temp\timedicer-2218529529-vss-setvar.cmd')
(Option: Execute binary/script after shadow creation 'C:\Users\omitted\AppData\Local\Temp\timedicer-2218529529-action.bat')
ERROR: invalid parameter 'f:'
Note the reference to drive F, which doesn't exist. I'm trying to back up drive C.
The server is running rdiff-backup rather than TimeDicer. TimeDicer.txt contains the following options:
SET server=10.1.1.1
SET excludelist=C:\Users\omitted\AppData\Roaming\TimeDicer\exclude-filelist.txt
SET options=--no-acls -v3 --no-eas --remote-schema 'c:\program files\putty\plink' -ssh -C -l omitted 10.1.1.1 -i 'c:\program files\putty\ssh_key.ppk' %%s rdiff-backup --server"
omitted, C:\
SET user=omitted
SET key="c:\program files\putty\ssh-key.ppk"
SET basearchive=/data/backups/rdiff-backup/omitted/daily
SET VSS=y
I'm using TimeDicer 5.0910 on Windows 7 Professional 32 bits. The server is running CentOS 5.11.
Any suggestions? Thanks.
Did you make any progress with rdiffWeb ver 0.7?
I have just had to restore a backup. RdiffWeb could not handle it because of wrong caracter-set (danish caracters i filenames). To try to solve that it would be good to work with the latest version of rdiffWeb.
I have a broken filenames encoding while copying files from windows 7 client to linux server.
These files are names in russian.
Any ideas?
I hope you can continue to find time to maintain your fine solution.
rdiffweb has got a new maintainer w_ww.patrikdufresne.c_om/en/rdiffweb/ and a version 7.0
w_ww.patrikdufresne.c_om/en/rdiffweb-release-7.0/
I have not found a way to see the version-number on the Timedicer Server. Is it runnning 7.0 or do you plan to include it ?
I think the problem is that you have specified a path with slashes for the repository, but the repository or destination must be a single directory name. You can use the configuration option 'SET basearchive=" or /b command-line switch to set directory levels above the repository - the directories specified for basearchive must already exist on the TimeDicer Server. Hope this helps.
thank you very much for this elegant backup tool. I get an error "Cannot perform a cyclic copy" when try to backup whole C: drive. I believe I must have misconfigured something. I have SET options=--no-acls -v5 C:,_Failai/TimeDicer/C Any help would be highly appreciated, thanks!
thank you for this fantastic tool. i've a problem here.
my timedicer server OS failed, so i had to re-install the OS.
i manage to keep all old backups. then i fixed the login for clients users by deleting the users and adding them again.
the problem is that all backup shows successful but with 0 bytes and says "No Previous Revisions".
i'm sure there is data changes but still receive this.
this shows for both windows and Linux clients.
thank you for your time.
Would it be better to check that basearchive is writeable by the client? Then you're covered too if basearchive is an absolute path not under $HOME.
/home/tmp would only exist on older TimeDicer Servers, but isn't required. For 4.1106 and above, the first test (which the above setting will skip) verifies ssh write access to the client's home folder on the server; a failure at this stage narrows down the cause (i.e. nothing to do with rdiff-backup).
I restricted the timekeeper client key with command="rdiff-backup --server" in the authorized_keys file. This works fine, but I needed to comment out the hometmpexists code section. I don't use ubuntu, so I don't understand the /home/tmp thing; but I wondered whether it was better to configure the server side with the correct tmp location rather than probing from the client?
Thanks for this fantastic effort. I've been trying to find a commercially free piece of software that handles deltas like this and isn't clunky or hard to configure and especially supports VSS. The only thing I've noticed so far is if one is installing in 14.04.1 LTS, one must uncomment the authorized keys line in /etc/ssh/sshd_config and make sure ~/.ssh/ and ~/.ssh/authorized_keys are set to 600 not 770 which apparently is now the default for . folders in the users home dir under 14. If I can get my implementation approved here, I'll be sending a donation your way ASAP. :)
-Luke
I've run into a problem with the timedicer-mirror.sh script:
Checking destination /home total disk space - 3928G
Checking destination /home/backup space used - 0G
1160G used on source /home, 3928G total (incl unused) on destination /home - 2768G implicit surplus - ok
/opt/timedicer-mirror.sh: line 526: 3.95055e+09/1048576: syntax error: invalid arithmetic operator (error token is ".95055e+09/1048576")
This first error is due to $REMOTESPACEAVAILABLE containing a number in scientific notation (3.5e+09). Both machines have 4TB of space and the mirror is 99% empty. Bash doesn't support floating point arithmetic (let alone scientific notation). I was able to solve this by using a printf in the awk command instead of a print:
REMOTESPACEAVAILABLE=`echo "$DFREMOTE $REMOTEHOMEBACKUP"|awk '{printf ("%.0f", $4+$NF)}'`
Afterwards:
Checking destination /home total disk space - 3928G
Checking destination /home/backup space used - 0G
1160G used on source /home, 3928G total (incl unused) on destination /home - 2768G implicit surplus - ok
3767G available on destination, 10G default headroom needed - skipping space check
So far so good, but then this happens:
Preparing destination /home/backup
Making LVM snapshot of source /dev/XX/root at /dev/XX/rootbackup Logical volume "backup" already exists in volume group "XX"
couldn't create logical volume /dev/XX/rootbackup, aborting...
Thanks for any suggestions you may have!
Using subst could be a neat workaround, but you might have to put 'set VSS=n' in your configuration file i.e. don't backup from a snapshot. I suspect snapshots will not be possible from a virtual drive letter as allocated by subst.
There were no problems manipulating the folders through windows explorer (win7 x64, enterprise edition), so I didn't need the long path tool.
Thanks again.
If you don't need backup of the folders that are beyond the 255 character limit, you could try adding them to your exclude list, though I don't know if this would work.
A rather horrible workaround is to move that portion of the source which is beyond the 255 character limit to a different location where the pathname would be shorter. I appreciate this may not be possible in your case...
Also it has been suggested that Long Path Tool can help (find it with google), I haven't tried it and I am not sure if you have to pay to use it. If you do give it a go I would be very interested to know if it works.
I do think I've run into a problem with long file paths (more than 255 characters). I consistently get the following exception with certain files:
Exception '[Error 3] The system cannot find the path specified: 'W:/a/long/path/name/*.*'' raised of class '':
File "rdiff_backup\robust.pyc", line 32, in check_common_error
File "rdiff_backup\rpath.pyc", line 998, in listdir
They backup fine after reducing the path length to 255 characters or less, but that is not always an option.
I can't thank you enough for all the help you've provided in making this backup solution available and helping me to get it working. I'm a complete Linux newbie and your instructions were perfect. It appears to me that the few problems I had were entirely due to my inability to read carefully enough.
For a small office solution to the problem of reliable, restorable, safe, and easy-to-access backups Timedicer is superb. And equally appealing was the ability to take an older machine which was no longer in service, put in a new hard drive, and have Timedicer Server running quickly.
Thank you.
Robert Rosenwald
President
Poisoned Pen Press
Thank you so much for TimeDicer. I know that once I get it working it will do exactly what I need.
I believe I have followed your instructions meticulously and everything has gone like clockwork until I try to do a backup using timedicer.cmd. What I get is the following:
TimeDicer v3.1102
Session Sat 11/09/2013 13:52
using configuration 'C:\Users\Robert\AppData\Roaming\TimeDicer\timedicer.txt'
FATAL ERROR: Network error: Connection refused
Cannot make connection to robert-robert-home-pc@192.168.1.5
TimeDicer failed with error 9 - cannot connect to Server
Log at C:\Users\Robert\AppData\Roaming\TimeDicer\timedicer-log....
Press any key to continue . . .
I have used Putty to login to my timedicer server using the public key which exists as authorized_keys in the .ssh/ directory and it works perfectly, but when I try to run the cmd file whether as a user or administrator I get the error above.
I have also tested using the default timedicer.txt file and one where I commented out all but the SET server=192.168.1.5
Any suggestion where I should next look would be much appreciated.
Sincererly
Robert Rosenwald
President
Poisoned Pen Press--Discover Mystery
6962 E. 1st Ave. #103, Scottsdale, AZ 85251
your project looks very promising to me, and it's
great you provide this kind of 'out-of-the-box-solution'.
But nevertheless I'd like to use your TimeDicer-
client to backup to rdiff-backup on an existing server.
I think I don't need the web frontend for a start
(no user access - managed by admin only ;),
so what do I need to configure on the server to use
rdiff-backup with your TimeDicer-Client?
I probably need the accounts and homes it uses,
and I probably need to put the public key into the .ssh subdirectory of the user on the server side?
I didn't try it yet, but am I missing someting,
or do you think I can start this way?
Best regards and thanks for TimeDicer - in advance
Matthias
I haven't implemented this feature but you should be able to run it successfully from the command prompt (e.g. putty) on the server. You would need to specify the base archive correctly, perhaps this was your problem?
If you need to 'regress' your archive, that is remove the most recent, rather than the oldest, backups, then I have a script to do this. It can be helpful if a recent backup has bloated your archive because it inadvertently included some big files you don't want (and which you have subsequently excluded from backup through the excludelist).
BTW - Thanks for a really good implementation of rdiff-backup for windows users!
I wonder about an option to turn off use of ssh as I think this probably slows down large backups significantly, and on a local network the risk of a man in the middle attack is very low.
What do you think?
Mark
http://theWebalyst.com
Thanks for your very well implemented TimeDicer wrapper and setup, and particularly the documentation you've provided. I've been wanting a decent backup solution and after a long search was concluding that rdiff-backup was the best option for me, and with TimeDicer it is even better.
FYI I have set TimeDicer up on a Windows 7 x64 client for backup to my Excito B3 Linux server (Debian Squeeze). This was fairly straightforward, but required some manual tweaks. There's only one problem (non-critical), and not with TimeDicer.
PROBLEM
With both rdiff-backup and TimeDicer I have a problem with the first full backup failing after around 45-50G and no info as to why. It is not the same file. It isn't to do with access problems.
Doing manual rdiff-backup - I tried increasing -vX levels in rdiff-backup, but this wasn't greatly helpful:
- if the level is too high (e.g. -v9) the backup aborts after a few seconds!
- just right (-v7) and the backup completes but is way slower!
- too low (-v6) and it fails around 45G-50G, but will complete if repeated.
Caveat: These conclusions are based on only a few runs, so not necessarily 100% true.
WORKAROUND
So far, if I just redo the backup command it completes ok, "topping up" the failed backup with the remaining files (up to 160G).
QUESTIONS
1) I wonder if you or anyone else has experience with very large backups using rdiff-backup, and any reasons why it should choke in this way after a certain amount, but then be able to complete even though the remaining backup is even bigger!?
2) Also, is there any reason NOT to just repeat the backup command after a failure like this?
3) Do you have a mailing list or any way to be kept informed of updates?
4) Setting up for B3 Linux, I encountered some problems. One was failure of "Setup user 'admin' private/public key". Am I right to think this is only needed for mirror to another server? (I completed the process manually, but would like to know what this is for in case I have not yet got it setup correctly).
BUGS
FYI: Your Windows setup script failed to start PuTTY at any time. I think there might have been some other minor glitches, but the information it provided made it easy to complete the process anyway (e.g. by starting PuTTY manually).
For example, I had some trouble getting ssh to work without prompting for a password (as usual!), and this issue was not caught by timedicer.cmd. Instead it alternated between telling me it couldn't connect to the server, or issuing endless "Wrong passphrase" messages which was rather confusing.
I hacked timedicer.cmd to see what was going on and then used plink.exe manually to debug this area. The issue was that I hadn't set up the public key properly on the server, which I find is often tricky, solved by copying the public key from the PuTTYgen dialog instead of copying the from one of the saved key files. (I think when you do the latter the newlines that break the key over several lines mess things up.)
SUGGESTION
I'd like to suggest a security tip regarding the public keys: in the authorised_keys file (on the server) it is possible to restrict use of each key to an IP address range, and to a particular command. Worth considering!
I would really appreciate your response to my questions. Let me know if you would like a new web host because as amongst other things I operate a hosting service, and would be delighted to host TimeDicer et al.
Thanks again,
Mark
http://theWebalyst.com
Trying to install on Ubuntu Server 12.04 get the following error:
sed: can't read /usr/lib/python2.7/dist-packages/rdiffWeb/db_sqlite.py: No such file or directory
An error occurred modifying /usr/lib/python2.7/dist-packages/rdiffWeb/db_sqlite.py, aborting...
Install CherryPy and rdiffWeb [FAIL]
I can see this is coming from rdiffWeb which I also tried manually downloading and installing with the same error.
Any advice?
sudo wget http://www.timedicer.co.uk/server/timedicer-server-setup
(If you provide your email address and tick the option to 'notify me about new comments on this page' you will hear immediately when a comment is added, you can always unsubscribe later...)
The fix worked for me. Now I got a bit further. When I get to the "Download and extract key scripts from www.timedicer.co.uk" part I receive the following message:
/opt/timedicer-server-setup: line 183: syntax error near unexpected token 'fi'
/opt/timedicer-server-setup: line 183: 'fi'
Best regards,
Angel
sudo wget http://www.timedicer.co.uk/server/timedicer-server-setup
sudo chmod 744 timedicer-server-setup
The 'sudo' command means that the actual command following is run not as the normal user but as 'root' (you may have to enter your password) - root has full permissions to go anywhere, do anything, unlike the normal user which is restricted. So by using 'sudo' the command should now work.
I have updated the web page too with this advice. Let me know how you get on.
I'm using Linux for the first time in order to get your application up and running in a test environment. First of all I'd like to thank you for the great job you've done both building TimeDicer and writing this step-by-step installation and configuration manager.
I'm kind of stuck in the middle of the server setup process. I've just reached step three - downloading and running the timedicer-server-setup, but when I get to the
wget http://www.timedicer.co.uk/server/timedicer-server-setup
part, I get the following message:
timedicer-server-setup: Permission denied
Cannot write to 'timedicer-server-setup' (Permission denied)
I realize that I'm on the absolute beginner level as far as Linux is concerned and I'd like to apologize for wasting your time on that issue... yet, your help will be highly appreciated!
Best regards,
Angel
A workaround may be to disable VSS by adding this line in your configuration file:
SET vss=n
I have a problem with EFS (encrypted files) not getting backed up, they are just ignored. I was hoping they would be backed up in their encrypted state. I'd guess that the issue is with rdiff-backup. Any idea how I can get this working?
Thanks
The html client log is now working pretty well. The client program no longer pauses by default, only if it has hit an error (pausing can as before be overridden with /x switch).
Email me if you are aware of any bugs or have any feature requests.
However, considering the limitations and quirks, as well as trying to decipher Windows batch file programming, I'll think I'll move on to writing my own using python.
It should be fairly simple and way fewer lines of code to accomplish what the Windows batch file is trying to do. And doing it in something like python will make it readable and more easily maintainable.
When I have something available, I could drop you an email if you would be interested in trying/testing it out. Since it will use vshadow and rdiff-backup, if should be compatible with your backend server setup.
For the second problem, the latest version 2.0102 should address this, please let me know if you still experience it.
I also notice that even though I added the /x command so that the TimeDicer.cmd exits, it must still pause or something if there is some sort of error. This causes a cmd.exe to be left running and the task scheduler to never say it is finished and no future attempts to backup will occur.
Regarding working in python, that is beyond me, it sounds like a good new project if you want to try it?!
Regarding the messages you saw, these all relate to the problem of rdiff-backup.exe hanging on to the log file after it has finished. Please try the new version of TimeDicer.cmd (2.0101) which may resolve this problem.
Your other suggestions can I think be handled by you calling TimeDicer.cmd from another batch script which can perform what you want.
I think that environment would be much more comfortable (for me at least) than fragile .cmd scripts. Have you considered that?
My first backup last night showed a few lines of
'The process cannot access the file because it is being used by another process.
The process cannot access the file because it is being used by another process.'
in the logs.
However, one of the directories to be backed up was not even attempted. It appears in the summary of the html log, but there is no mention of it in the rest of the log and it did not run. However, the lastchanges*.txt file was updated as if it worked. Very scary.
Other changes that I think are essential are
o The ability of the backup process to first run a --remove-older-than 30D
o The ability to email the rdiff output when finished rather than remembering to check a log file on several machines.
Regarding your second problem, the reason is that Windows 7 has a 'Documents' folder not 'My Documents'. So this should work for you:
%USERPROFILE%\Documents,Documents
"Once you are happy with your backup you should add it as a task to Task Scheduler to run (say) daily. [When invoking from the Task Scheduler, use the /x option]"
1) I added as a task to Task Scheduler with Action
of "C:\Program Files (x86)\TimeDicer\TimeDicer.cmd"
When the script finishes the Task Scheduler is unware. When I look at the Task Manager, cmd.exe is still running. I know TimeDicer is finished because it finished writing its output log.
2) I specified a Backup path of
%USERPROFILE%\My Documents,Documents
and rdiff-backup fails. If I change that to
C:\Users\myusername\Documents,Documents it works.
Yet using %USERPROFILE%\Desktop works fine.
No new directory under /home an no new .ssh. No new line in /etc/passwd.
We find that a bit lang, and want to change it to just "longcomputername".
On the client we can do:
Set user=longcomputername
But on the server we cannot add a new TimeDicer User. It ends with:
there is already a user with this name. Aborting...
Is it impossible to reuse the last part of a username ?
Existing Servers can be updated by following the instructions at 'Updating Server' above; to avoid email message about deprecated code when you add a user, choose to reinstall rdiffWeb.
SET port=
which sets the port (default 22).
I think it should be possible to set TimeDicer as a Scheduled Task for a user and it would still run when user is not logged on? But I haven't tried this.
I know how to change port in plink.exe, when I write by own bat-files, but cannot find a way to pass a port-number through Timedicers advanced cmd-file.
Is it possible to change port in Timedicer ?
Do you have any ideas about, how to install Timedicer as a service, so it can run at night witout any user logged in on the server?
The workaround for now is, in exclude-filelist.txt, not to use the drive letter for directories in C: drive.
Might be a problem with network-drives or systems with data on a D:-partitions from the factory.
\Users\mc\AppData\Roaming\Thunderbird\
If only the latter works, let me know and I will fix it so the former works too.
On my windows 7 laptop I have a directory
c:\Users\mc\AppData\Roaming\Thunderbird\
that I do not want to backup.
How do you put a directory in exclude-filelist.txt ?
If there is a failed rdiff-backup session and as result the archive is not marked as 'clean' then on the next session rdiff-backup should automatically 'regress' the archive to its previous clean state. This does usually work, but if there is a breakdown while this regression is happening you might then get irrecoverable damage, but still you can probably retrieve manually all or nearly all of the latest versions of current files.
I have to say that you are not the first to request a non-local primary backup, and there is no problem with doing it technically, but a local primary backup (e.g. on VM) with a secondary offsite backup is more robust I think.
In most of the places, where I plan to use Timedicer, they cannot / don't want to have a local server. You very strongly recommend only to run backups from TimeDicer Client to a server over a reliable local connection, not over internet.
Is the rdiff-backup's limited recovery capability (if the connection gets broken), on the current data or only on the old data-sets ?
Let's say, the most valuable data, a family have, is their digital photos of children growing up. There is very little change in those photos, only new ones coming in, so they can live with uncertanty about rolling back to old versions.
When running timedicer-server-setup it ends with an error: line 253: mail: command not found
Then I installed mailutils and run server-setup again. No error and I got an email with setup-results.
The link to Ubuntu Server works fine, maybe there was a temporary problem with their website? I recommend you stick with 10.04LTS because the instructions here are tailored for that version. If you use a later version it may be fine but some steps may be different.
I'm not convinced of the value of connecting without ssh, I have never heard before of it contributing to connection problems. I very strongly recommend that you only run backups from TimeDicer Client to TimeDicer Server over a reliable local connection, not over internet (even VPN), but this is because rdiff-backup has limited recovery capability if the connection gets broken. rsync is good at recovering from broken connections and so this is used for mirroring the Primary TimeDicer Server to an offsite mirror server.
Allowing users not to use ssh would open up potential security problems, although I accept that over a VPN it may not have much practical value (except against internal snooping). But you could look into it yourself if you like, TimeDicer Client uses plink to connect to the Server and you could modify the code lines (2 in all I think, one to test the connection [which can be skipped], and one to run the backup).
Regarding the changelog, the dates are there really in the version numbers: [year mod 100].[2-digit month][2-digit day]
The source is all available here, and no the software does not 'phone home'.
first of all thank you for all this, great job!
Amazed that I found your page so "late", as I have been looking for similar backup solutions for quite a while and never came across yours.
Questions/notes
The link you mention,
"Ubuntu 10.04LTS Server (64-bit or 32-bit), obtainable here."
"http://www.ubuntu.com/server/get-ubuntu/download"
leads to a 404.
Would the one searched via google "Ubuntu 10.04LTS Server" be OK, or could we use the newer version?
Also, is there a way to use your software without any SSH?
On one hand traffic is local and does not need SSH.
On the other, mirroring via remote location, it goes through a VPN tunnel so again, SSH is not needed.
It would be nice to be able to exclude that by choice, as I think that SSH through a shaky connection adds to the lack of reliability of those connections.
However a VPN tunnel is rock solid.
I had the same issues with rsync & rdiff-backup.
I also do strongly recommend to include date stamps to you changelog, it will give visaitors a sense of when what was daone, if it is up to date at all etc.
Also, is the source available? Does your program "phone home"?
I found that a few do, and that is quite disturbing, as it would give the writer of the software an opportunity to get into your system.
Again, thanks for all your efforts!
From West LA, CA
Jimmy
Your idea is interesting but I can't see a way to do it. TimeDicer uses the vshadow utility which creates a snapshot from a given source (in this case, a drive) and maps this to a share, typically \\?\GLOBALROOT\Device\HarddiskVolumeShadowCopy1.
I can't see how to achieve this for data from the other VSS writers you have identified. Let me know if you find out more.
This is a very nice utility. I've been able to incorporate into a nightly backup process for server servers, and it is working well.
In the log file, I notice that VSHADOW.EXE provides several writers and components, such as the IIS Metabase Writer, with the \IISMETABASE component. Can these components be used as sources in config file? For example, could I specific \IISMETABASE (or even \Registry) as a source and have rdiff-backup copy the contents to my backup server?
Thanks.
If you use an existing machine as TimeDicer Server you have the problem of how to backup that machine - whereas a standalone TS can backup *all* your existing machines, then you have an offsite mirror to backup TS and so all your data on all your machines is safe.
I think it is important that setup of TS is pretty easy and standard. Say your existing primary TS fails, you just create a new one, run timedicer-mirror to mirror contents from your mirror TS to the new primary and you now have your running primary TS again. If the TS configuraton is bespoke (because the machine is doing other stuff) you would need a different (bespoke) approach to recover a bust TS.
So, we could look at modifying the config script to work for a clean install of Arch, or alternatively I could look at putting some instructions on this page as to how anyone could retrofit TS onto an existing machine (any Linux distro), but these would describe the required steps (e.g. install rdiff-backup, install rdiffweb), not how to do them.
The Arch equivalent command would be pacman -S --noconfirm <package name>.
The packages your install script grabs are all in the Arch repositories although under different names.
wol, apache, php, rdiff-backup, and sshfs that I can see.
But the differences in layout might be a tough can of worms. I'm pretty sure the web root is elsewhere for instance, and Arch uses BSD style init scripts instead of sysvinit. It looks like this would clobber a machine that already had Apache and a site setup on it rather than just placing the new files in a webroot subfolder for instance.
But I have a test box I can play with and see what breaks (and maybe even learn more Linux in the process :)
We can take this to my sporadically checked email if you like.
One request. Could you produce a how-to on manually installing this on a general distro?
I have an Arch linux system all ready setup with rdiff and would like to just add or "convert" it to timedicer. I've looked through your install script and honestly my bash skills are a little wanting.
Thanks for your ingenuity and skills!
TimeDicer concept, implementation and documentation by Dominic Raferd dominic@timedicer.co.uk.